Validating domain objects
We have learned about Extbase and Fluid in detail, but considered terms of consistence of the domain only marginally. Often we estimate that domain objects at all times retain consistent according to certain rules. This is not done automaticly, so it is rather important to define these rules explicitly. In the blog example for example we can make the folowing rules:
- The field
usernameandpasswordof the user object must have at least 5 characters. Furthermore the username must not contain special characters. - The field
emailof the user object must contain a valid email address.
These rules must apply at every point in time for the user object; on the other way a user object is only valid if it complies to these rules. These rules are called invariants, because they must be valid during the entire lifetime of the object.
In a first step you have to consider which invariants your domain objects have to offer. The next point is to put these invariants to Extbase in an appropriate form. Extbase provides validators for checking the invariants - these are PHP classes in which the invariants are implemented in code.
We will show you in the following how you can use a validator for the checking of invariants, and how you can give the user the possibility to correct an error when an error occurs.
Validators for checking of Invariants
A validator is a PHP class that has to check a certain invariant. If
the invariant is fulfilled than the validator returns true
otherwise false. In Extbase all validators have to implement
the interface
\TYPO3\CMS\Extbase\Validation\Validator\ValidatorInterface.
In this interface some methods are defined. The most important is called
isValid($object). An object or value is passed over to it and
it must return true when the object or value is valid,
otherwise it returns false. There are some more methods in
the ValidatorInterface to make it possible to pass
settings and poll error messages. We recommend to inherit all validators
from the
\TYPO3\CMS\Extbase\Validation\Validator\AbstractValidator,
because you get a default implemetation of the helper methods and you only
have to implement the isValid() method.
Tip
You will find the complete reference of the
ValidatorInterface in Appendix B.
For example, a validator which checks whether the passed string is an email address looks like this:
public function isValid($value) {
    if (!is_string($value) || !$this->validEmail($value)) {
        $this->addError(
            $this->translateErrorMessage(
                'validator.emailaddress.notvalid',
                'extbase'
            ), 1221559976);
    }
}

protected function validEmail($emailAddress) {
    return \TYPO3\CMS\Core\Utility\GeneralUtility::validEmail($emailAddress);
}
When $value is a string that compares to a (complex)
regular expression, the validator returns true. Otherwise an
error message is generated using addError() and then it
returns false.
Tip
The method addError() expects an error message and an
error code. The latter should be unique, therefore we recommend to use
the UNIX timestamp of the creation time of the source code. With the
help of the error code the error can be definitely identified, for
example in bug reports.
As default, extbase will not call your validator if the value to validate is
empty. This is configued through the property $acceptsEmptyValues which is
set to true as default.
In the package
\TYPO3\CMS\Extbase\Validation\Validator\* Extbase offers
many validators for default requirements like the validation of emails,
numbers or strings.
When does validation take place?
Domain objects in Extbase are validated only at one point in time: When they get inserted into a controller action. With the help of figure 9-1 we can show what happens before the action is called.
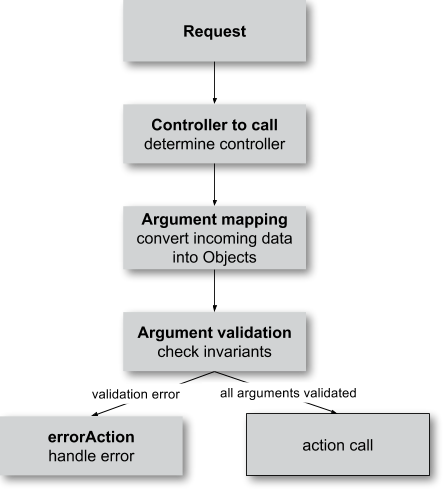
Figure 9-1: Data flow of a request before the action is called
When a user sends a request, Extbase first determines which action respectively controller is responsible for this request. As Extbase knows the names and types of the arguments of the action it can create objects from the incoming data. This operation will be described in detail in the section "Argument mapping" later on. Now the main step for us is as follows: The created objects are to be validated, that is the invariants are to be checked. If all arguments are successfully validated, the requested action of the extension is called and it can continue processing the given objects for example give it to the view for displaying.
Tip
Certainly it would be helpful if the validation is also be done during the persisting of the objects to the database. At the moment it is not done since the data is stored in the database after sending the answer back to the browser. Therefore the user could not be informed in case of validating errors. In the meantime a second validating when persisting the objects is built into FLOW3, so this will be expected in Extbase in the medium term.
When an error occurs during validation, the method
errorAction() of the current controller is
called. The provided default errorAction() redirects the user
to the last used form when possible, in order to give him a chance to
correct the errors.
Tip
You may ask how the errorAction() knows
which form was the last displayed one. This information is created by
the form ViewHelper. He adds automaticly the property
__referrer to every generated form, which contains
information about the current extension, controller and action
combination. This data can be used by the
errorAction() to display the erroneous form
again.
Registering validators
Now we know how validators are working and when they are called. However we have to connect our domain model with the validators to define which part of the model is has to be checked by which valiator. Therefore there are three possibilities which we define in the following:
- validating in the domain model with annotations
- validating in the domain model with an own validator class
- validating of controller arguments
Validating in the domain model with annotations
In most cases it is sufficient to validate the properties of a domain object separately. When all properties are validated with success the complete domain object is also successful validated; when a property can not be validated the validation of the complete domain object fails.
To define how a property of our domain object should be validated
we use so called annotations of our source code.
Annotations are machine readable "annotations" in the source code that
are placed in comment blocks and start with the character
@.
For the validaton the @validate annotation is
available. With it we can specify which validator is to be used for
checking the annotated property. Let us take a look at this using a part
of the domain model Post of the blog example:
<?php
namespace MyVendor\BlogExample\Domain\Model;

class Post extends \TYPO3\CMS\Extbase\DomainObject\AbstractEntity {
    /**
     * @var string
     * @validate StringLength(minimum=3, maximum=50)
     */
    protected $title;

    /**
     * @var string
     */
    protected $content;
}
With the line @validate StringLength(minimum=3,
maximum=50) the validator for the property $title is
specified. In paranthesis the parameter for the validator are specified.
In our case we make shure that a title of a blog post is never shorter
than three characters and will never be longer than 50 characters.
Which validator class is to be used? Extbase looks for a validator
class using
\TYPO3\CMS\Extbase\Validation\Validator\*ValidatorName*Validator.
Using the above given annotation @validate StringLength the
validator
\TYPO3\CMS\Extbase\Validation\Validator\StringLengthValidator
is used.
When you have created your own validator to check the invariants
you can use it in the @validate annotation using the full
class name, like shown in the following example:
<?php
namespace MyVendor\BlogExample\Domain\Model;

class Post extends \TYPO3\CMS\Extbase\DomainObject\AbstractEntity {
    /**
     * @var string
     * @validate \MyVendor\BlogExample\Domain\Validator\TitleValidator
     */
    protected $title;

    /**
     * @var string
     */
    protected $content;
}
Here we validate the property $title with the
\MyVendor\BlogExample\Domain\Validator\TitleValidator.
This validator class now can check any invariants. For example, the
validator shown in the following listing checks whether the title of a
blog post is always build-on the scheme Maintopic:
Title:
<remark>TODO: insert code here</remark>
Now you have seen how you can validate particular properties of the domain model. The next section shows to you, how complex domain objects are to be validated.
Validating in the domain model with an own validator class
The just introduced possibilities to register validators in the
model is sepecially practical when individual properties of the model
are to be validated. Sometimes it is necessary to validate the
relationship between two or more properties of a model class. For
example for a user registration it is reasonable that in the user object
the property $password and $passwordConfirmed
exists which should be identical. Therefore the individual validators
for $password respectively
$passwordConfirmation can not help, because they have no
access to each other. You need a option to validate a domain object
as a whole.
For this you can implement an own validator class for every object in the domain model which validates the object as a whole and with it access to all object properties is possible.
Important hereby is the correct naming convention. If you need a
validator for the class
\MyVendor\ExtbaseExample\Domain\Model\User it must be
implemented in the class
\MyVendor\ExtbaseExample\Domain\Validator\UserValidator.
The name of the validator for a model object is incidental by replacing
the namespace Model with Validator and also
append Validator. When following the naming convention the
validator is automatically called when it exists.
Equipped with this knowledge we can implement the
UserValidator which compares $password with
$passwordConfirmation. At first we must check if the given
object is of the type user - after all the validator can be
called with any object and has to return false in such
case:
<?php
namespace MyVendor\ExtbaseExample\Domain\Validator;

class UserValidator extends \TYPO3\CMS\Extbase\Validation\Validator\AbstractValidator {
    public function isValid($user) {
        if (! $user instanceof \MyVendor\ExtbaseExample\Domain\Model\User) {
            $this->addError('The given Object is not a User.', 1262341470);
            return FALSE;
        }
        return TRUE;
    }
}
So, if $user is not an instance of the user object an
error message is directly created with addError(). The
validator does not validate the object any further but returns
false.
Tip
The method addError() gets two parameters - the
first is an error message string while the second is an error number.
The Extbase developers always uses the current UNIX timestamp when
calling addError(). By this it is secured that the
validation errors can be unique identified.
Now we have created the foundation of our validator and can start with the proper implementation - the check for equality of the passwords. This is made quickly:
<?php
namespace MyVendor\ExtbaseExample\Domain\Validator;

class UserValidator extends \TYPO3\CMS\Extbase\Validation\Validator\AbstractValidator {
    public function isValid($user) {
        if (! $user instanceof \MyVendor\ExtbaseExample\Domain\Model\User) {
            $this->addError('The given Object is not a User.', 1262341470);
            return FALSE;
        }
        if ($user->getPassword() !== $user->getPasswordConfirmation()) {
            $this->addError('The passwords do not match.', 1262341707);
            return FALSE;
        }
        return TRUE;
    }
}
Because we have access to the complete object the checking
for equality of $password and
$passwordConfirmation is very simple now.
Now we have got to know two possibilities how validators can be
registered for our domain objects: directly in the model via
@validate annotation for single properties and for complete
domain objects with an own validator class.
The illustrated validators until now are always executed when a domain model is given as parameter to a controller action - that is for all actions. Sometimes it is desired to initiate the validation only when calling special actions. How this can be done we will see in the next section.
Validating of controller arguments
If you want to validate a domain object only when calling a
special action you have to define validators for individual arguments.
Therefore a slightly modified form of the @validate
annotation can be used which is set in the comment block of the
controller action. It has the format @validate
*[variablename] [validators]*, in the example
below it is $pageName \MyVendor\MyExtension\Domain\Validator\PagenameValidator:
/**
 * Creates a new page with a given name.
 *
 * @param string $pageName THe name of the page which should be created.
 * @validate $pageName \MyVendor\MyExtension\Domain\Validator\PageNameValidator
 */
public function createPageAction($pageName) {
    ...
}
Here the parameter $pageName is checked with an own
validator.
Interaction of validators
Now you know three possibilities how validators are to be registered. For an argument of an action the following validators are called:
- The data types of the (primitive) arguments are checked.
When a parameter is defined with
@param floatas a floating number then the validator checks this. When you want to disable the type validation for an argument, you have to declare the type asmixed. - All
@validateannotations of the domain model are evaluated. - The validator class of the domain object is called when it exists.
- More validators that are defined in the action with
@validateare called.
Lets have a look at the interaction once more with an example:
/**
 * Creates a website user for the given page name.
 *
 * @param string $pageName The name of the page where the user should be created.
 * @param \MyVendor\ExtbaseExample\Domain\Model\User $user The user which should be created.
 * @validate $user \MyVendor\BlogExample\Domain\Validator\CustomUserValidator
 */
public function createUserAction($pageName, \MyVendor\ExtbaseExample\Domain\Model\User $user) {
    ...
}
Here the following things are validated: $pageName
must be a string. The data type of the
@param annotation is validated. For $user all
@validate annotations of the model are validated. Also the
\MyVendor\BlogExample\Domain\Validator\UserValidator is called if
it exists. Beyond that the validator
\MyVendor\BlogExample\Domain\Validator\CustomUserValidator is used
to validate $user.
In some use cases it is reasonable that inconsistent
domain objects are gives as arguments. That can be the case
for multi page forms, because after filling the first page the domain
object is not complete. In this case you can use the annotation
@ignorevalidation *$parameter*. This
prevents the processing of the @validate annotations in the
domain model and calling the validator class of the domain
object.
Case study: Edit an existing object
Now you know all building blocks you need to edit a blog object with
a form. Hereby the edit form should be displayed again in case of a
validation error. Two actions are involved at editing the blog: The
editAction shows the form with the blog to be edited and the
updateAction saves the changes.
Tip
If you want to implement edit forms for the domain objects of your extension you should implement it according to the schema displayed here.
The editAction for the blog looks like this:
public function editAction(\MyVendor\BlogExample\Domain\Model\Blog $blog) {
    $this->view->assign('blog', $blog);
}
The blog object that we want to edit is passed and given to the view. The Fluid template than looks like this (slightly shortened and reduced to the important):
<f:form name="blog" object="{blog}" action="update">
    <f:form.textbox property="title" />
    <f:form.textbox property="description" />
    <f:form.submit />
</f:form>
Note that the blog object to be edited is bound to the
form with object="{blog}". With this you can reference a
property of the linked object with help of the property
attribute of the form elements.
Also the name of the form (name="blog") is important because it is
used as variable name for the object to be send. When submitting the form
the updateAction is called with the blog object
as parameter.
public function updateAction(\MyVendor\BlogExample\Domain\Model\Blog $blog) {
    $this->blogRepository->update($blog);
}
<constraintdef>
So the name of the argument is $blog because the form
has the name blog. When no validating errors occur, the blog object will
be persisted with its changes.
Now have a look what happens when the user inserts erroneous data
in the form. In this case an error occurs when validating the
$blog arguments. Therefore instead of the
updateAction, the
errorAction is called. These action routes the
request with forward() to the last used action because in
case of an error the form should be displayed again. Additional an error
message is generated and given to the controller. Ergo: In case of a
validation error the editAction is displayed
again.
As we want to display the erroneous object again it is important
that the updateAction and editAction use the
same argument names. In our example the argument is called
$blog in both cases, so we are on the safe side.
Now we get an other problem: Also the editAction
validates all parameter, but our blog object is not valid - we are
captured in an endless loop. Therefore we have to suppress the argument
validation for the editAction. For this we need the
annotation @ignorevalidation ``- the comment block of the
``editAction must be changed like this:
/**
 * @param \MyVendor\BlogExample\Domain\Model\Blog $blog The blog object
 * @ignorevalidation $blog
 */
public function editAction(\MyVendor\BlogExample\Domain\Model\Blog $blog) {
    $this->view->assign('blog', $blog);
}
Now the blog object is not validated in the
editAction. So also a non valid blog object is
displayed correct.
Tip
If Extbase thows the exception
TYPO3CMSExtbaseMvcExceptionInfiniteLoopException it signs that the
@ignorevalidation annotation is missing.
Fluid automatically adds the CSS class f3-form-error
to all erroneous fields - so you can frame them in red for example using
CSS. There is also a flashMessages ViewHelper which outputs
the error messages of the validation.
</constraintdef>
Case study: Create an object
In the last section you have seen how to edit a blog object with a
form. Now we will show you how to create a new blog object with a form.
Also for creating a blog object two actions are involved. The
newAction shows a form for creating an object and
the createAction finally stores the
object.
The only difference to the editing of an object is that the
newAction is not always given an argument: when
first displaying the form it is logical that there is no object available
to be displayed. Therefore the argument must be marked as optional.
Here you will see all that we need. At first the controller code:
/**
 * This action shows the 'new' form for the blog.
 *
 * @param \MyVendor\BlogExample\Domain\Model\Blog $newBlog The optional default values
 * @ignorevalidation $newBlog
 */
public function newAction(\MyVendor\BlogExample\Domain\Model\Blog $newBlog = NULL) {
    $this->view->assign('newBlog', $newBlog);
}

/**
 * This action creates the blog and stores it.
 *
 * @param \MyVendor\BlogExample\Domain\Model\Blog $newBlog
 */
public function createAction(\MyVendor\BlogExample\Domain\Model\Blog $newBlog) {
    $this->blogRepository->add($newBlog);
}
The Fluid template for the newAction looks
like this (in short form):
<f:flashMessages />
<f:form name="newBlog" object="{newBlog}" action="create">
    <f:form.textbox property="title" />
    <f:form.textbox property="description" />
    <f:form.submit />
</f:form>
What is the summary of what we have we done? Again it is important
that the newAction and the
createAction have the same argument name. This
has also to conform with the name of the Fluid template
(newBlog in the example). Also the parameter for the
newAction must be marked as optional and the
validation of the parameter must be suppressed with
@ignorevalidation. Finally you can output validation errors in
the template using the flashMessages ViewHelper when saving
the data.
In figure 9-2 you find an overview of the behavior of Extbase when displaying, editing respectively creating of domain objects in the frontend.
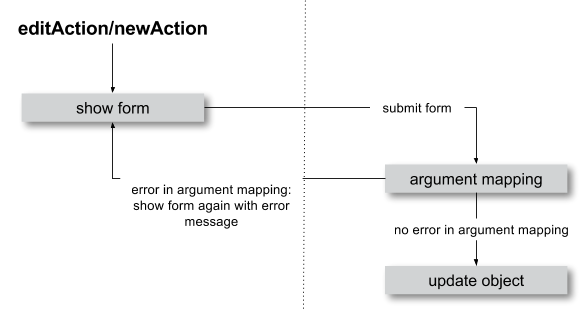
Figure 9-2: Data flow of the form display and saving. When a validating error occurs it is displayed again.
Mapping arguments
In this section we would describe in detail what happens during a request before the accordingly action is called. Particular interesting is this process when sending a form. Because the HTTP protocol (and PHP) only can transfer arrays and strings, a big array with data is transferred when sending a form. In the action, domain objects are often expected as input parameter, so somehow the array must become an object. That is done by Extbase during the so called Argument Mappings. It makes it possible that as an user of Extbase you not only work with arrays, but you can change objects in forms or give over a complete object as parameter in links.
Lets have a look at all of this in a concrete example: We pick up
the blog example extension and edit a blog object, like you got to know in
the last section ("Case study: Edit an existing object"). When you edit a
blog you see a form in which you can change the properties of the blog, in
our case title and description.
The Fluid form looks like this (shortened to the essential):
<f:form method="post" action="update" name="blog" object="{blog}">
    <f:form.textbox property="title" />
    <f:form.textbox property="description" />
</f:form>
If the form is submitted the data will be sent in the following manner to the server:
tx_blogexample_pi1[blog][__identity] = 5
tx_blogexample_pi1[blog][title] = My title
tx_blogexample_pi1[blog][description] = Description
First of all the data is tagged with a prefix that contains the name
of the extension and the plugin (tx_blogexample_pi1). This
makes sure that two extensions have no impact on each other. Furthermore
all changed properties of the blog object are transferred in an array, in
our case title and description. As we want to
change a blog object, we also need the identity of the blog object. In
order to do this, Fluid automatically adds the __identity
property for the blog object and fills it with the UID of the
blog.
Now on the server side a blog object must be created
out of this information. This is the job of the property mapper. His
operation method is shown in figure 9-3.
For every argument it must be decided first whether a new object has
to be created or if the work is based on an existing object. This will be
decided based on the identity property __identity. If this is
not in the input data a new object is created. Otherwise the framework
knows the object identity and can go on work with it.
Tip
When you take a look at what is transferred to the server by the new action of the blog example, you will find that no identity properties are transferred - in this case a new object is created as desired.
In the blog example from above the __identity property is available, therefore the object with the corresponding UID is fetched from the repository and used for further modification.
When no properties should be changed the object is given as argument to the action. So that is always persistent, that is changes to this object are saved automatically. <remark>!!!Sentence not clear</remark>
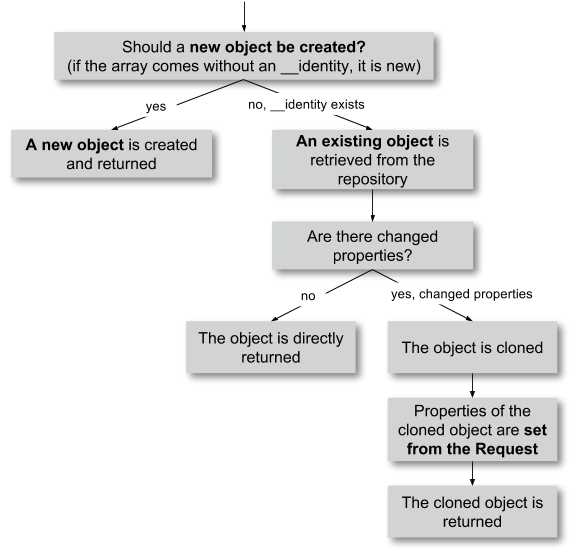
Figure 9-3: The internal control flow of the property mapper.
In our case not only the __identity property is sent,
but also a new title and description for our
blog. For safety reasons a copy of the persistent
object is applied. The properties of the copy are changed as given in the
request, in our case title and description are
set new. The generated copy is yet a transient object (see section "live
cycle of objects" in chapter 2), that is changes on the object are
not automatically persisted. The changed copy is
given to the action as argument.
Now we have to code in our controller explicit that we want to
replace the existing persistent blog object with our changed
blog object. For this the repository offers a method
update():
$this->blogRepository->update($blog);
With this the changed object will be made into the persistent object: The changes are stored permanent now.
We want to assume a refinement of the argument mapping: When a link
to an action is generated and the link contains an object as parameter the
identity of the object is transferred automatically. In the following
example the UID is transferred instead of the blog
object:
<f:link.action action='show' arguments='{blog: blog}'>Show Blog</f:link.action>
The generated URL contains the identity of the blog object:
tx_blogexample_pi1[blog]=47. That is a short form of
tx_blogexample_pi1[blog][__Identity]=47. Therefore the
property mapper gets the blog object with the identity 47 from the
repository and returns it directly without copying before.
Now you know the argument mapping in detail an can use it in specific in your own projects.
After you have learned how you can make sure any invariants of domain objects, the focus will be directed to the secure programming of the complete extension.